


Step 1 – Determine the best growing space
There are several things to take into consideration when determining which space is most appropriate for your indoor seedling setup including warmth, ability to waterproof the space, moisture level of the space, tolerance of dirt (and, perhaps, the tolerance of your significant other for using common areas), etc.
Ability to heat your space is an important consideration. Sixty degrees is good for cool season crops (kale, lettuce, etc.) and warmer season crops prefer something closer to 75 degrees (tomatoes, peppers, basil, etc.) Generally you’ll be able to get most things to germinate above 55 degrees, it will just affect how long it takes. (Kale takes about three days to germinate at 65 degrees.)

Wet basements are not ideal because they’re often too cool (50 degrees or so) and often too moist for growing healthy plants. That said, I’ve seen plenty of people put set-ups in their basements that have worked great. Just make sure you’ve got some supplemental heat (space heater, heat mats) for your warmer season crops and a dehumidifier/fan to keep air circulating in order to prevent disease. Check out Seed Starting 101 to learn more about getting started.
Step 2 – Make a schedule
Different crops take different amounts of time to grow to the size where it is appropriate to plant them out. At 65 degrees with a near optimal lighting set-up, kale should take about 4 weeks to grow while peppers should take about 9. Lots of the information is available on your seed packet or in seed catalogues about crop needs. Check out how to make a seeding schedule.
Most people wait until May or June to begin “transplanting out” their seedlings. Plants that are more cold tolerant can go out before the risk of frost has passed in April and May (see below). Others aren’t quite as hardy and need to wait until June before they can be planted outside.
You’ll want to take this into consideration when planning your garden. Make sure to give your plants several weeks to grow inside before planting them out. Roots should be well formed and should hold the soil together before planting out. Seed Starting 101 has more on this.
- Cold tolerant plants: onions, leeks, kale, collards, Swiss chard, spinach, head lettuce, pac choi, cabbage, broccoli, parsley, cilantro
- Warm season plants: tomatoes, peppers, eggplant, basil, cucumbers, melons, squash, zucchini, pumpkins
Why aren’t carrots on the list? What about beets? These plants are best direct-seeded in the garden. The general rule is if you eat the root of the plant it likely won’t do well as a transplant. As always, there are some exceptions. I’ve planted beets and rutabaga both as seedlings but find that it doesn’t make sense for most garden set-ups.
Subscribe below to get a copy of my seeding schedule which includes information such as which crops I direct seed and which I grow as transplants, days to transplant, and container size.
Step 3 – Purchase (or repurpose!) what you need to grow
Here’s what you’ll need to get started:
- Potting soil/media – There are lots of options out there. I recommend OMRI approved organic media or media with only natural ingredients like worm castings and blood meal.
- Lights
- Containers for your seedlings
- Watering can and mister
- Seeds! – You can also check for seed swaps in your area. This is a great way to get a few seeds of various unique varieties without having to buy an entire packet.
Step 4 – Set up lights
Nothing beats full suns when it comes to growing plants. However, there often isn’t enough natural light available on a windowsill to grow good quality transplants. I highly recommend using supplemental lighting if your plants are not going to be in direct light for most of the day (we’re talking 10+ hours).

If you are lucky enough to have a south-facing sunroom with little to no shade, the rest of us are jealous. You should be fine. Everybody else: consider a lighting system! You can learn more about the best set up for your situation in the post about lighting for seedlings.
Step 5 – Plant your seeds!
Some people like to save seeds from their plants from year to year. The possibility of doing this depends on the plant and whether it is a hybrid or an open pollinated/heirloom variety. A great explanation can be found on the High Mowing Seeds website.
Most people buy seeds either online or at their local garden supply center. Seed packets often have special instructions for different seed needs – consult the packet to learn more about what your seeds need to grow.
Seeds typically like to be planted at about twice the depth of their diameter. (e.g., if the seed is 1/8 inch across then you’ll want to plant it about 1/4 inch deep in the soil.) Small seeds like broccoli and cabbage should be planted on the surface and covered lightly with soil. I always plant at least 30% more than I need to give myself a little buffer in case something doesn’t go as planned (poor germination, unexpected frost, urban pests…)

A quick note about seed storage: it’s likely you’ll have seeds leftover after seeding. Cool and dry is the best way to store them. (Between 33 and 40 degrees is best but 50 is also fine.) Don’t store them in the fridge! It’s too humid! Use a tupperware container with a tight fitting lid and make sure to put a desiccant inside to absorb excess moisture (such as the little silica packets that come in the box with a new pair of shoes — bet you’d never thought you’d have a use for THOSE again!) You can also fill the bottom of the bin with rice.
Step 6 – Water appropriately
The most important thing you will do for your seedlings is to make sure that they are appropriately watered. Not enough water can be detrimental but having too much water can be just as bad.
You should start off by misting them at the seed germination stage and move to a watering can once they grow larger. They’ll need more frequent watering at the germination stage and a larger amount of it less frequently once they’re bigger. Naturally, plants use more water during the daytime while they’re growing under light so no need to drench your plants at night. Check out more in depth tips here.
Step 7 – Pot up or fertilize as needed
You may want to give your plants a little boost once they’re a few weeks old to prevent them from becoming nutrient-stressed and turning yellow. If your potting soil is high quality, many of your plants should be able to go 3-4 weeks without any supplemental fertility. Worm castings (aka worm poop) and compost make great fertilizers for plants, although your homemade compost is likely not stable enough for delicate transplants.
You can turn castings or compost into a liquid decoction (more readily accessible to plants) by soaking in water for 24 hours and watering your plants with the liquid. Make sure not to soak for more than 24 hours — compost and worm castings are alive and they can turn anaerobic without the proper ventilation which is bad for your plants.
Fish emulsion and seaweed solutions can also be used for fertility but they are a bit more expensive and can be pretty stinky.
“Potting up” makes sense for crops that take longer than about 4-6 weeks to grow to size before they’re ready to plant out. This includes tomatoes, peppers, and eggplant plus a couple of others. Once plants have outgrown their initial container it’s time to put them in something larger. For more check out the post about containers.

Step 8 – Move the lights
As your seedlings grow taller you’ll want to adjust the height of the lights to make sure they aren’t touching the plants but that they’re still close enough to get as much light intensity as possible. It’s a good idea to hang them from chains or something easily adjustable for this reason.
Step 9 – Troubleshoot
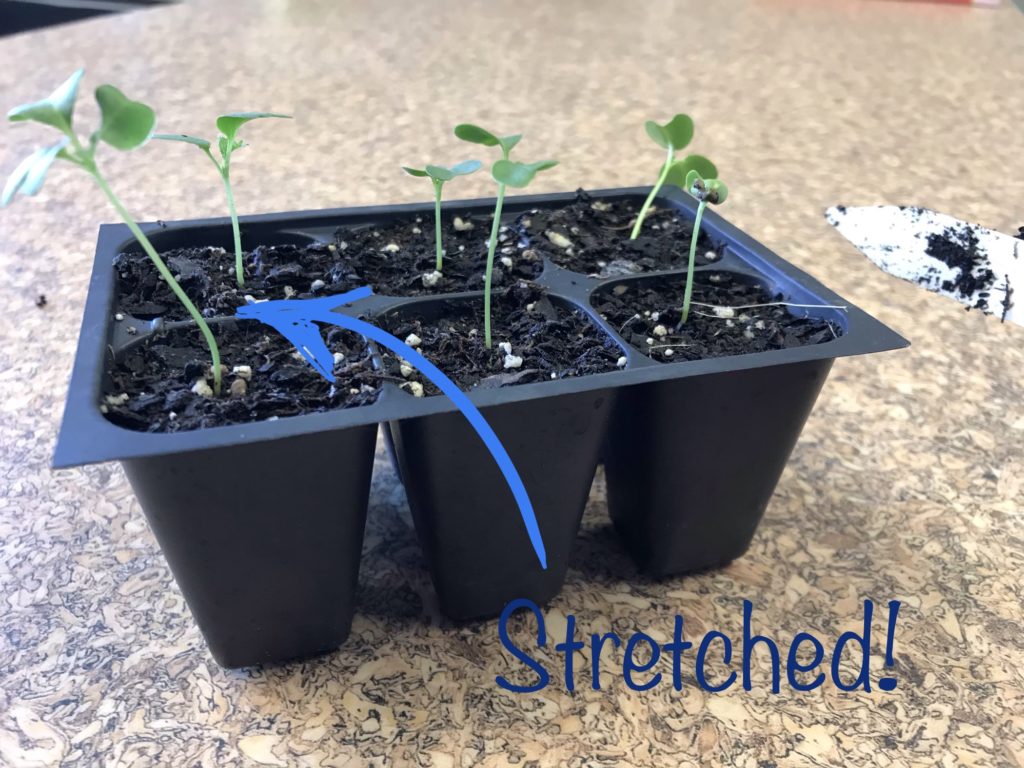
My seeds are leggy and flimsy. What’s wrong? This usually means that your seedlings are not getting enough light because they’re trying to stretch toward it. Try giving them supplemental light, up to 16 hours a day, and make sure that your lights are as close to the plant as possible. Sometimes warmer temperatures can also encourage legginess. Try lowering the temperature of the room if your plants seem to have enough light but are still stretching.
My plants are rotting at the base of their stem! Help!This may be from a fungal pathogen referred to as “damping off.” Certain crops are especially susceptible, like Swiss chard and spinach. This pathogen thrives in cold wet environments so make sure you’re letting the soil surface dry down a bit before watering your plants.
Questions like this are bound to come up. Check out the Troubleshooting page for answers to some frequently encountered problems. If you don’t see your question, you can either get in touch with us directly or post in the comments to see what others have to say! (I’ll get back to you either way.)
Step 10 – Harden off
Congratulations! Your plants are officially teenagers and about ready to leave the nest. You’ve given them lots of love and attention but now you’ll want to spend about the last week of their transplant life preparing them to withstand the elements in big scary world. (Get a job already!) You can learn more about hardening off stage on the Seed Starting 101 page.
Remember, Always check the 10-day forecast before planting to make sure that weather is decent before planting. Although cool season crops like kale can handle very cold temps, it doesn’t mean they can handle freezing and snow on their third day in the garden. Tomatoes, peppers, and eggplants don’t like it much below 50. It takes a bit for plants to adjust from their transplant shock so you’ll want to make sure you set them up for success.